Introduction
This post is an updated version of our previous blog post titled Testing a DApp from First Principles. As before, we will be going over the steps required to get the Solidity Remix IDE ‘Donation’ tutorial up and running on an Ethereum private-net. The tutorial that we will be basing this post off of is available at Remix IDE's ReadTheDocs, but we have received permission from yann300 to publish the two required files here. This post will include some additional steps that are now required for the DApp to function properly.
For this tutorial, we will be using the same toolset as before. We picked geth as our Ethereum node, Mist as our DApp browser, and Python's SimpleHTTPServer as our web server for static files. Geth allows us to store and read data on the blockchain. The web server allows us to quickly serve static HTML, CSS, and JavaScript files to be used by our DApp. The Mist browser serves as a bridge between these two paradigms of information technology, allowing us to load and utilize the static files from our web server as well as communicate with our Ethereum node via the injected web3.js object.
Our previous experiences have led us to conclude that running a geth node in dev mode is the best way to develop and test a DApp. While there exist other development platforms such as Ganache, we've discovered that there is no better way to simulate a DApp's behaviour on the mainnet than to develop using geth dev mode.
For this updated tutorial, we will be using the newly released standalone version of Remix IDE. Go ahead and install it using npm or yarn.
$ yarn global add remix-ide
$ yarn global add remix-ide
$ yarn global add remix-ide
This tutorial was written using geth version 1.8.6-stable, and Mist version 0.10.0.
Initializing geth
First, let's create a folder to store our blockchain data.
Next, let's start our geth node pointing at our newly created data directory. We will be running geth in dev mode so that our DApp will be deployed to our single node private-net, thus avoiding the financial burden of building and testing a DApp on the main-net.
$ geth --dev --datadir test-chain-dir console
$ geth --dev --datadir test-chain-dir console
$ geth --dev --datadir test-chain-dir console
In your geth terminal window, you should see an output similar to below
INFO [05-17|14:32:51] Maximum peer count ETH=25 LES=0 total=25INFO [05-17|14:32:52] Using developer account address=0xf92EcEa910C31e302699e58B866bD2604527dD1dINFO [05-17|14:32:52] Starting peer-to-peer node instance=Geth/v1.8.6-stable/darwin-amd64/go1.10.1INFO [05-17|14:32:52] Allocated cache and file handles database=/Users/danielbriskin/tut/test-chain-dir/geth/chaindata cache=768 handles=1024INFO [05-17|14:32:52] Writing custom genesis blockINFO [05-17|14:32:52] Persisted trie from memory database nodes=12 size=2.26kB time=54.111µs gcnodes=0 gcsize=0.00B gctime=0s livenodes=1 livesize=0.00BINFO [05-17|14:32:52] Initialised chain configuration config="{ChainID: 1337 Homestead: 0 DAO: DAOSupport: false EIP150: 0 EIP155: 0 EIP158: 0 Byzantium: 0 Constantinople: Engine: clique}"INFO [05-17|14:32:52] Initialising Ethereum protocol versions="[63 62]" network=1INFO [05-17|14:32:52] Loaded most recent local header number=0 hash=4374f1…a3fed1 td=1INFO [05-17|14:32:52] Loaded most recent local full block number=0 hash=4374f1…a3fed1 td=1INFO [05-17|14:32:52] Loaded most recent local fast block number=0 hash=4374f1…a3fed1 td=1INFO [05-17|14:32:52] Regenerated local transaction journal transactions=0 accounts=0INFO [05-17|14:32:52] Starting P2P networkingINFO [05-17|14:32:52] started whisper v.6.0INFO [05-17|14:32:52] RLPx listener up self="enode://38fb7579853407637b21437c1595a47995a63fd39cb7c0a192d891c68728c0d4ed7d0402517f9b915d924594b0e91441fbc6f7963a91f780f74119ab4db5291b@[::]:49775?discport=0"INFO [05-17|14:32:52] IPC endpoint opened url=/Users/danielbriskin/tut/test-chain-dir/geth.ipcINFO [05-17|14:32:52] Transaction pool price threshold updated price=18000000000INFO [05-17|14:32:52] Etherbase automatically configured address=0xf92EcEa910C31e302699e58B866bD2604527dD1dINFO [05-17|14:32:52] Starting mining operationINFO [05-17|14:32:52] Commit new mining work number=1 txs=0 uncles=0 elapsed=118.067µsWARN [05-17|14:32:52] Block sealing failed err="waiting for transactions"INFO [05-17|14:32:51] Maximum peer count ETH=25 LES=0 total=25INFO [05-17|14:32:52] Using developer account address=0xf92EcEa910C31e302699e58B866bD2604527dD1dINFO [05-17|14:32:52] Starting peer-to-peer node instance=Geth/v1.8.6-stable/darwin-amd64/go1.10.1INFO [05-17|14:32:52] Allocated cache and file handles database=/Users/danielbriskin/tut/test-chain-dir/geth/chaindata cache=768 handles=1024INFO [05-17|14:32:52] Writing custom genesis blockINFO [05-17|14:32:52] Persisted trie from memory database nodes=12 size=2.26kB time=54.111µs gcnodes=0 gcsize=0.00B gctime=0s livenodes=1 livesize=0.00BINFO [05-17|14:32:52] Initialised chain configuration config="{ChainID: 1337 Homestead: 0 DAO: DAOSupport: false EIP150: 0 EIP155: 0 EIP158: 0 Byzantium: 0 Constantinople: Engine: clique}"INFO [05-17|14:32:52] Initialising Ethereum protocol versions="[63 62]" network=1INFO [05-17|14:32:52] Loaded most recent local header number=0 hash=4374f1…a3fed1 td=1INFO [05-17|14:32:52] Loaded most recent local full block number=0 hash=4374f1…a3fed1 td=1INFO [05-17|14:32:52] Loaded most recent local fast block number=0 hash=4374f1…a3fed1 td=1INFO [05-17|14:32:52] Regenerated local transaction journal transactions=0 accounts=0INFO [05-17|14:32:52] Starting P2P networkingINFO [05-17|14:32:52] started whisper v.6.0INFO [05-17|14:32:52] RLPx listener up self="enode://38fb7579853407637b21437c1595a47995a63fd39cb7c0a192d891c68728c0d4ed7d0402517f9b915d924594b0e91441fbc6f7963a91f780f74119ab4db5291b@[::]:49775?discport=0"INFO [05-17|14:32:52] IPC endpoint opened url=/Users/danielbriskin/tut/test-chain-dir/geth.ipcINFO [05-17|14:32:52] Transaction pool price threshold updated price=18000000000INFO [05-17|14:32:52] Etherbase automatically configured address=0xf92EcEa910C31e302699e58B866bD2604527dD1dINFO [05-17|14:32:52] Starting mining operationINFO [05-17|14:32:52] Commit new mining work number=1 txs=0 uncles=0 elapsed=118.067µsWARN [05-17|14:32:52] Block sealing failed err="waiting for transactions"INFO [05-17|14:32:51] Maximum peer count ETH=25 LES=0 total=25INFO [05-17|14:32:52] Using developer account address=0xf92EcEa910C31e302699e58B866bD2604527dD1dINFO [05-17|14:32:52] Starting peer-to-peer node instance=Geth/v1.8.6-stable/darwin-amd64/go1.10.1INFO [05-17|14:32:52] Allocated cache and file handles database=/Users/danielbriskin/tut/test-chain-dir/geth/chaindata cache=768 handles=1024INFO [05-17|14:32:52] Writing custom genesis blockINFO [05-17|14:32:52] Persisted trie from memory database nodes=12 size=2.26kB time=54.111µs gcnodes=0 gcsize=0.00B gctime=0s livenodes=1 livesize=0.00BINFO [05-17|14:32:52] Initialised chain configuration config="{ChainID: 1337 Homestead: 0 DAO: DAOSupport: false EIP150: 0 EIP155: 0 EIP158: 0 Byzantium: 0 Constantinople: Engine: clique}"INFO [05-17|14:32:52] Initialising Ethereum protocol versions="[63 62]" network=1INFO [05-17|14:32:52] Loaded most recent local header number=0 hash=4374f1…a3fed1 td=1INFO [05-17|14:32:52] Loaded most recent local full block number=0 hash=4374f1…a3fed1 td=1INFO [05-17|14:32:52] Loaded most recent local fast block number=0 hash=4374f1…a3fed1 td=1INFO [05-17|14:32:52] Regenerated local transaction journal transactions=0 accounts=0INFO [05-17|14:32:52] Starting P2P networkingINFO [05-17|14:32:52] started whisper v.6.0INFO [05-17|14:32:52] RLPx listener up self="enode://38fb7579853407637b21437c1595a47995a63fd39cb7c0a192d891c68728c0d4ed7d0402517f9b915d924594b0e91441fbc6f7963a91f780f74119ab4db5291b@[::]:49775?discport=0"INFO [05-17|14:32:52] IPC endpoint opened url=/Users/danielbriskin/tut/test-chain-dir/geth.ipcINFO [05-17|14:32:52] Transaction pool price threshold updated price=18000000000INFO [05-17|14:32:52] Etherbase automatically configured address=0xf92EcEa910C31e302699e58B866bD2604527dD1dINFO [05-17|14:32:52] Starting mining operationINFO [05-17|14:32:52] Commit new mining work number=1 txs=0 uncles=0 elapsed=118.067µsWARN [05-17|14:32:52] Block sealing failed err="waiting for transactions"The second last line of output shows that the node has begun mining blocks. However, the last line of output indicates that mining has been paused, as there are no transactions to include in the block. This is different from the output displayed in our previous tutorial. Since the time of writing of the original post, geth --dev has moved from a Proof of Work to a Proof of Authority mining algorithm. This has simplfied private-net DApp development, as we no longer need to worry about manually starting and stopping the miner. The miner will only mine blocks when there are transactions to be included.
Take note of the line stating that the IPC endpoint has been opened. This means that we can now launch Mist and connect it to our private-net. Let's do so.
Linux:
$ mist --rpc test-chain-dir/geth.ipc
$ mist --rpc test-chain-dir/geth.ipc
$ mist --rpc test-chain-dir/geth.ipc
Mac:
$ /Applications/Mist.app/Contents/MacOS/Mist --rpc test-chain-dir/geth.ipc
$ /Applications/Mist.app/Contents/MacOS/Mist --rpc test-chain-dir/geth.ipc
$ /Applications/Mist.app/Contents/MacOS/Mist --rpc test-chain-dir/geth.ipc
The Mist terminal window will begin to produce lines of output, and shortly thereafter we should see its splashscreen open. Press the Launch Application button to open the application window. You should see the following window.
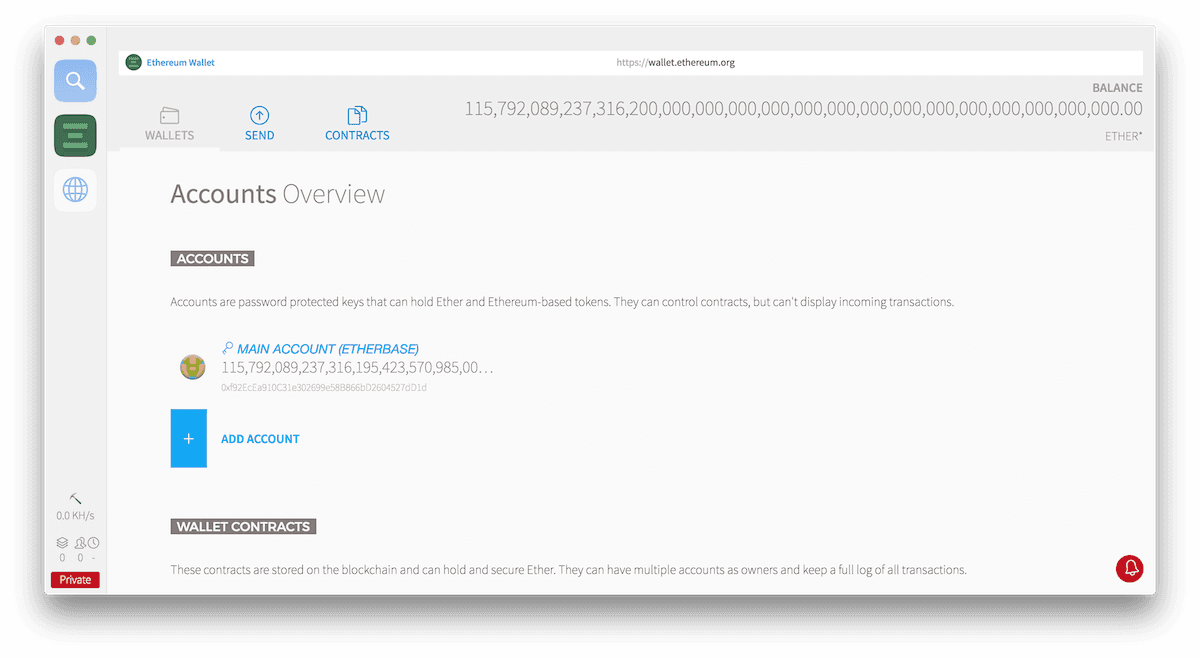
Note the absurdly large starting balance. We no longer need to mine blocks in order to generate Ether; we can simply send them from the Etherbase to our personal account, or use the Etherbase wallet directly.
On that note, let's switch back to our geth terminal window and create a personal account.
> personal.newAccount()Passphrase:Repeat passphrase:"0xb1c7a4b22525f920ccb4c43904bb86ca487f07fe"
> personal.newAccount()Passphrase:Repeat passphrase:"0xb1c7a4b22525f920ccb4c43904bb86ca487f07fe"
> personal.newAccount()Passphrase:Repeat passphrase:"0xb1c7a4b22525f920ccb4c43904bb86ca487f07fe"
Switch back to the Mist application window and we will see a new account in our Ethereum Wallet tab with an address matching the previous line of ouput. Its starting Ether balance will be zero. We can also check its balance from the geth terminal window.
> web3.fromWei(eth.getBalance(personal.listAccounts[1]), "ether")0
> web3.fromWei(eth.getBalance(personal.listAccounts[1]), "ether")0
> web3.fromWei(eth.getBalance(personal.listAccounts[1]), "ether")0
Feel free to also check the Etherbase's balance from the command line by switching the array index value from 1 to 0.
> web3.fromWei(eth.getBalance(personal.listAccounts[0]), "ether")1.15792089237316195423570985008687907853269984665640564039457584007913129639927e+59
> web3.fromWei(eth.getBalance(personal.listAccounts[0]), "ether")1.15792089237316195423570985008687907853269984665640564039457584007913129639927e+59
> web3.fromWei(eth.getBalance(personal.listAccounts[0]), "ether")1.15792089237316195423570985008687907853269984665640564039457584007913129639927e+59
Donation DApp
For this tutorial we will require two files:
Solidity smart contract file
contract Donation { address owner; event fundMoved(address _to, uint _amount); modifier onlyowner { if (msg.sender == owner) _; } address[] _giver; uint[] _values; function Donation() { owner = msg.sender; } function donate() payable { addGiver(msg.value); } function moveFund(address _to, uint _amount) onlyowner { uint balance = this.balance; uint amount = _amount; if (_amount <= this.balance) { if (_to.send(this.balance)) { fundMoved(_to, _amount); } else { throw; } } else { throw; } } function addGiver(uint _amount) internal { _giver.push(msg.sender); _values.push(_amount); }}contract Donation { address owner; event fundMoved(address _to, uint _amount); modifier onlyowner { if (msg.sender == owner) _; } address[] _giver; uint[] _values; function Donation() { owner = msg.sender; } function donate() payable { addGiver(msg.value); } function moveFund(address _to, uint _amount) onlyowner { uint balance = this.balance; uint amount = _amount; if (_amount <= this.balance) { if (_to.send(this.balance)) { fundMoved(_to, _amount); } else { throw; } } else { throw; } } function addGiver(uint _amount) internal { _giver.push(msg.sender); _values.push(_amount); }}contract Donation { address owner; event fundMoved(address _to, uint _amount); modifier onlyowner { if (msg.sender == owner) _; } address[] _giver; uint[] _values; function Donation() { owner = msg.sender; } function donate() payable { addGiver(msg.value); } function moveFund(address _to, uint _amount) onlyowner { uint balance = this.balance; uint amount = _amount; if (_amount <= this.balance) { if (_to.send(this.balance)) { fundMoved(_to, _amount); } else { throw; } } else { throw; } } function addGiver(uint _amount) internal { _giver.push(msg.sender); _values.push(_amount); }}
Save this file as Donation.sol
<pre><code class="html">
<div>
<div>Donation Contract</div>
<br/>
<input id='contractaddress' placeholder='contract address'></intput>
<br/>
<div>
<br/>
<input id='fromGive' placeholder='from' ></intput><input placeholder='amount' id='valueGive'></intput><button id="fallbackbtn" onclick="donate()">give</button>
<br/>
<br/>
<input id='fromMoveFund' placeholder='from' ></intput><input id='moveFundTo' placeholder='move to' ></intput><input id='amountToMove' placeholder='amount' ></intput><button id="movefundbtn" onclick="movefund()">moveFund</button>
<br/>
<br/>
<div id='wait' ></div>
</div>
<br/>
<br/>
<div id='log'>
</div>
</div>
<script type="text/javascript">
function donate () {
var donation = contractspec.at(document.getElementById('contractaddress').value)
donation.donate({
from: document.getElementById('fromGive').value,
value: document.getElementById('valueGive').value
}, function (error, txHash) {
tryTillResponse(txHash, function (error, receipt) {
alert('done ' + txHash)
})
})
}
function movefund () {
var donation = contractspec.at(document.getElementById('contractaddress').value)
donation.moveFund(
document.getElementById('moveFundTo').value,
document.getElementById('amountToMove').value,
function (error, txHash) {
tryTillResponse(txHash, function (error, receipt) {
alert('done ' + txHash)
})
})
}
var contractspec = web3.eth.contract([{"constant":false,"inputs":[{"name":"_to","type":"address"},{"name":"_amount","type":"uint256"}],"name":"moveFund","outputs":[],"payable":false,"type":"function"},{"constant":false,"inputs":[],"name":"donate","outputs":[],"payable":true,"type":"function"},{"inputs":[],"payable":false,"type":"constructor"},{"anonymous":false,"inputs":[{"indexed":false,"name":"_to","type":"address"},{"indexed":false,"name":"_amount","type":"uint256"}],"name":"fundMoved","type":"event"}]);
function tryTillResponse (txhash, done) {
document.getElementById('wait').innerHTML = 'waiting for the transaction to be mined ...'
web3.eth.getTransactionReceipt(txhash, function (err, result) {
if (!err && !result) {
setTimeout(function () { tryTillResponse(txhash, done) }, 500)
} else {
document.getElementById('wait').innerHTML = ''
var log = document.createElement("div")
log.innerHTML = JSON.stringify(result)
document.getElementById('log').appendChild(log)
done(err,result)
}
})
}
</script>
</code></pre><pre><code class="html">
<div>
<div>Donation Contract</div>
<br/>
<input id='contractaddress' placeholder='contract address'></intput>
<br/>
<div>
<br/>
<input id='fromGive' placeholder='from' ></intput><input placeholder='amount' id='valueGive'></intput><button id="fallbackbtn" onclick="donate()">give</button>
<br/>
<br/>
<input id='fromMoveFund' placeholder='from' ></intput><input id='moveFundTo' placeholder='move to' ></intput><input id='amountToMove' placeholder='amount' ></intput><button id="movefundbtn" onclick="movefund()">moveFund</button>
<br/>
<br/>
<div id='wait' ></div>
</div>
<br/>
<br/>
<div id='log'>
</div>
</div>
<script type="text/javascript">
function donate () {
var donation = contractspec.at(document.getElementById('contractaddress').value)
donation.donate({
from: document.getElementById('fromGive').value,
value: document.getElementById('valueGive').value
}, function (error, txHash) {
tryTillResponse(txHash, function (error, receipt) {
alert('done ' + txHash)
})
})
}
function movefund () {
var donation = contractspec.at(document.getElementById('contractaddress').value)
donation.moveFund(
document.getElementById('moveFundTo').value,
document.getElementById('amountToMove').value,
function (error, txHash) {
tryTillResponse(txHash, function (error, receipt) {
alert('done ' + txHash)
})
})
}
var contractspec = web3.eth.contract([{"constant":false,"inputs":[{"name":"_to","type":"address"},{"name":"_amount","type":"uint256"}],"name":"moveFund","outputs":[],"payable":false,"type":"function"},{"constant":false,"inputs":[],"name":"donate","outputs":[],"payable":true,"type":"function"},{"inputs":[],"payable":false,"type":"constructor"},{"anonymous":false,"inputs":[{"indexed":false,"name":"_to","type":"address"},{"indexed":false,"name":"_amount","type":"uint256"}],"name":"fundMoved","type":"event"}]);
function tryTillResponse (txhash, done) {
document.getElementById('wait').innerHTML = 'waiting for the transaction to be mined ...'
web3.eth.getTransactionReceipt(txhash, function (err, result) {
if (!err && !result) {
setTimeout(function () { tryTillResponse(txhash, done) }, 500)
} else {
document.getElementById('wait').innerHTML = ''
var log = document.createElement("div")
log.innerHTML = JSON.stringify(result)
document.getElementById('log').appendChild(log)
done(err,result)
}
})
}
</script>
</code></pre>Save this file as index.html
Create a new folder called webserver and move the index.html into it. Open the folder in a terminal window and run the following command.
$ python -m SimpleHTTPServer
$ python -m SimpleHTTPServer
$ python -m SimpleHTTPServer
Now open your default browser and load http://localhost:8000. Open the developer console to see any output.
We will see the following screen.
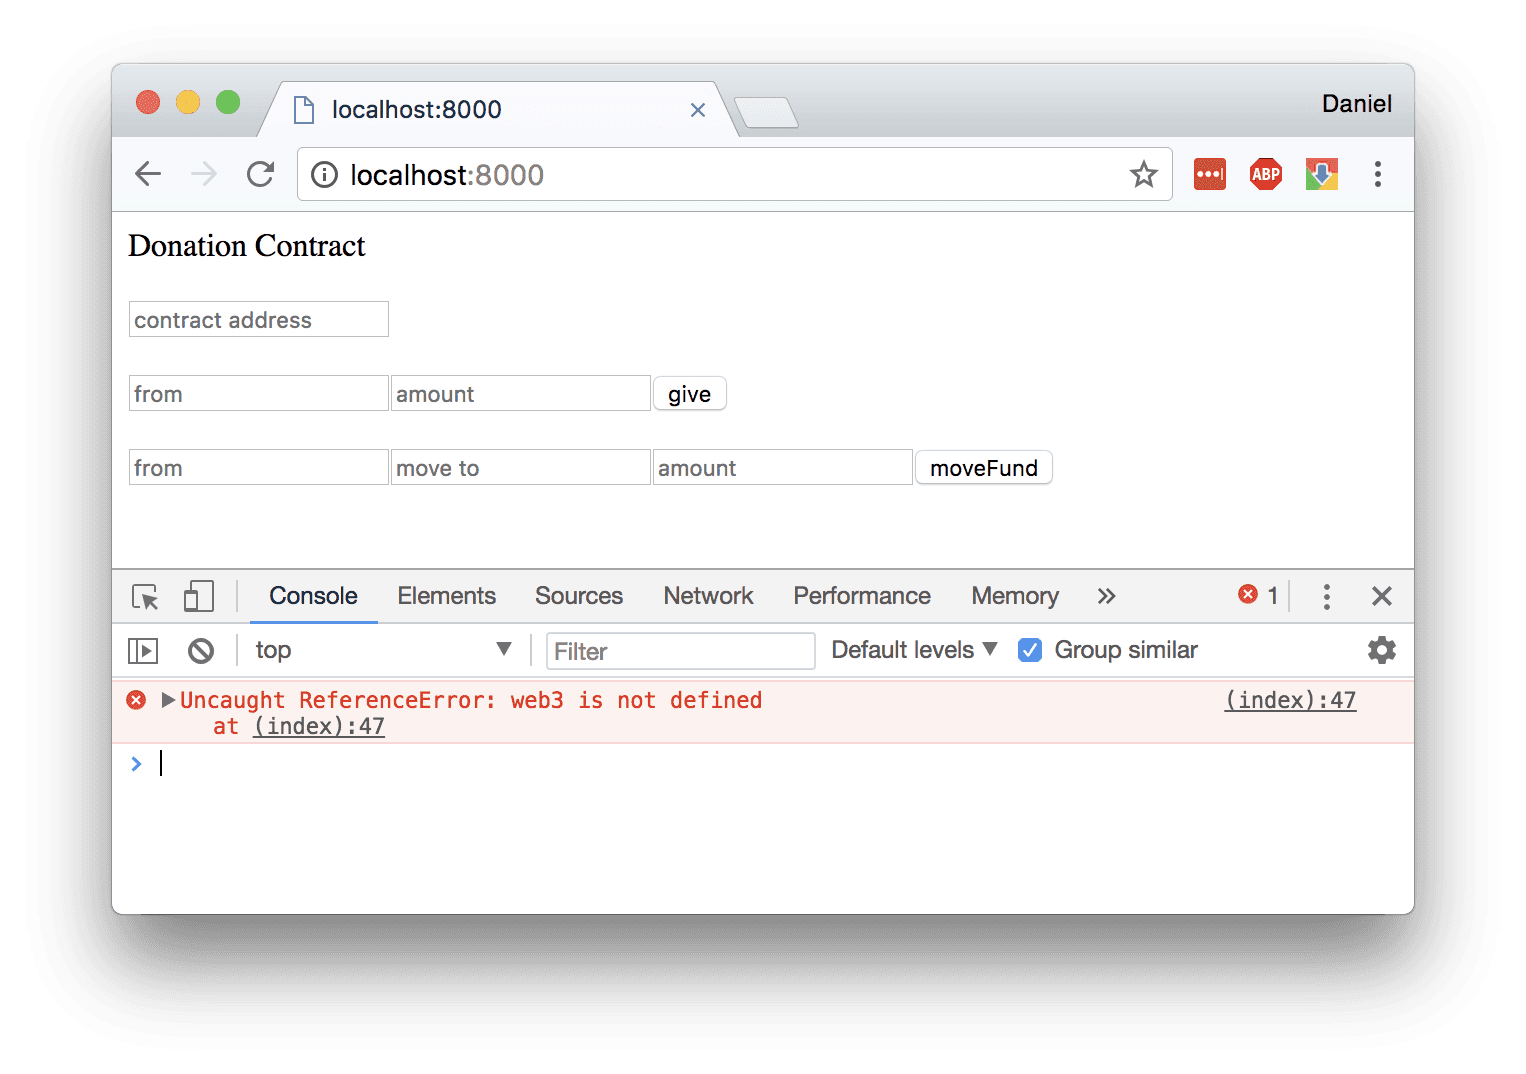
Notice the error in the console. As expected, Chrome does not support web3. That's partially the reason why we need to use Mist.
Now open http://localhost:8000 in Mist. Open the developer console by right clicking on the page. You should see the same error.
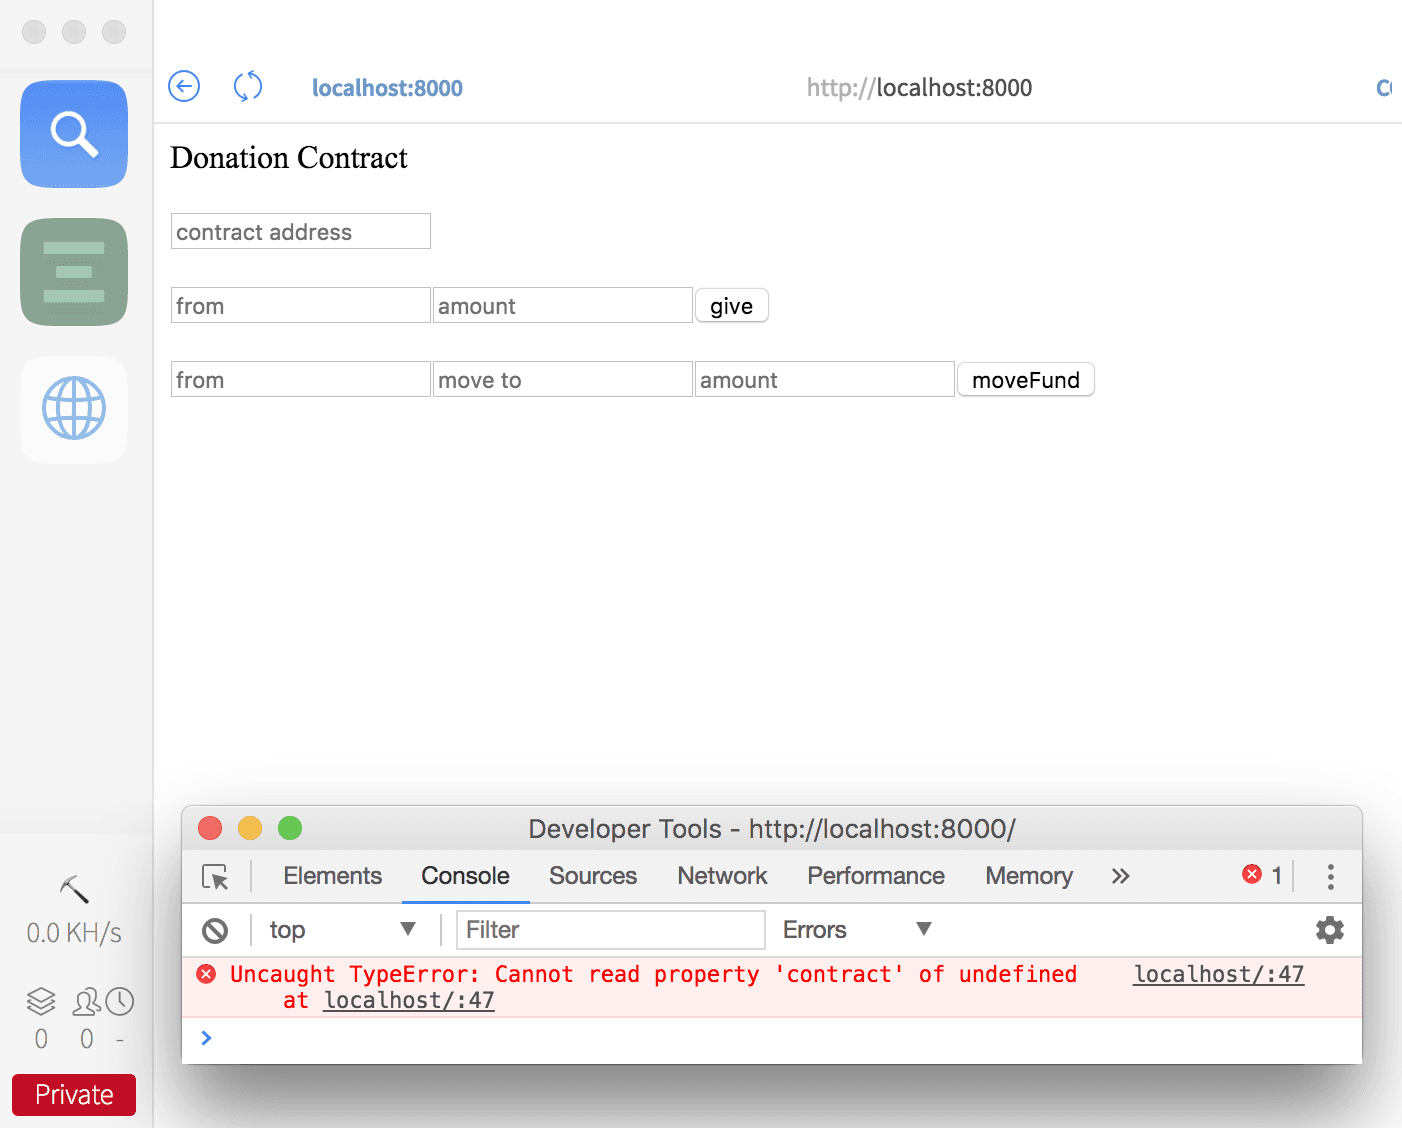
Looks like web3 still isn't defined. Let's include the JavaScript file in index.html.
Below the closing </div> at line 20, add the following line
<script src="https://cdn.jsdelivr.net/gh/ethereum/web3.js/dist/web3.min.js"></script>
<script src="https://cdn.jsdelivr.net/gh/ethereum/web3.js/dist/web3.min.js"></script>
<script src="https://cdn.jsdelivr.net/gh/ethereum/web3.js/dist/web3.min.js"></script>
Refresh the page in Mist. You should still be seeing the same error. Why?
As it turns out, we need to initialize web3 by providing it our geth node. This allows the web3.js plugin to connect with geth, thus allowing us to use a JavaScript API to read and write data to the blockchain.
Add the following code inside the <script> tag containing all the donation functions.
if (typeof web3 !== 'undefined') {
web3 = new Web3(web3.currentProvider);
} else {
web3 = new Web3(new Web3.providers.HttpProvider("http://localhost:8545"));
}if (typeof web3 !== 'undefined') {
web3 = new Web3(web3.currentProvider);
} else {
web3 = new Web3(new Web3.providers.HttpProvider("http://localhost:8545"));
}if (typeof web3 !== 'undefined') {
web3 = new Web3(web3.currentProvider);
} else {
web3 = new Web3(new Web3.providers.HttpProvider("http://localhost:8545"));
}Refresh the page in Mist. There should no longer be any errors in the console.
One might ask, if we need to go through all this trouble of including web3.js in our HTML and initializing it with a geth node connection, then what's the point of using Mist? Wouldn't all of this work in Chrome as well?
The short answer is that Mist provides other forms of integration to Ethereum. For example, in the top right corner of Mist, you should see a small icon. Click it, and a pop up containing your Ether wallets will appear. Using this modal, you are able to control which addresses may be used by DApps to make or receive payments. Traditional web browsers do not support this type of integration.
Deploying Donation.sol to the blockchain
Now that we have our frontend up and running, we need to deploy the Donation smart contract to our private-net blockchain.
Start by running Remix IDE in a terminal window. Now that the standalone IDE is available, we highly recommend using it over the one integrated into Mist.
Open your Mist browser and load http://localhost:8080. You should see the following screen.
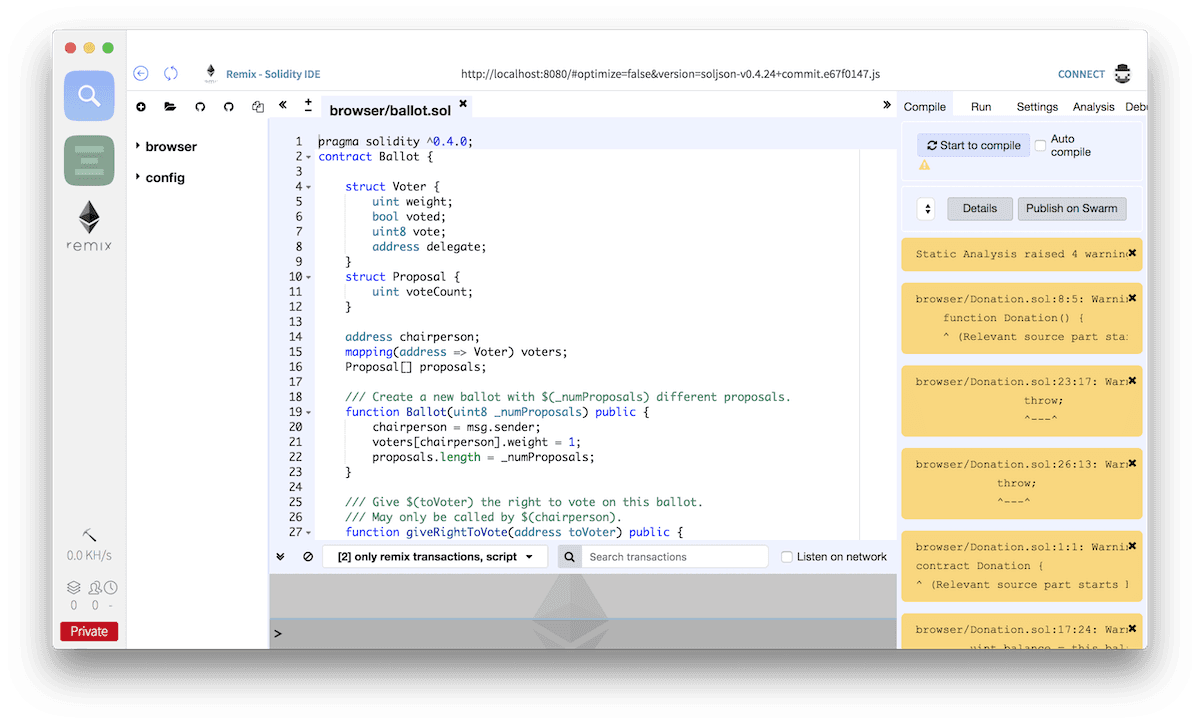
Close the default ballot.sol tab and open Donation.sol by pressing the folder icon in the top left corner of left panel. In the right hand panel, select the Compile tab and press the "Start to compile" button. You should see a list of warnings appear in the right panel, but we don't need to worry about these for the purpose of this tutorial.
In the right hand panel, switch to the Run tab. At the top of the panel, take note of the Environment dropdown. There are three options: JavaScript VM, Injected Web3, and Web3 Provider. In this dropdown, we can select where the smart contract will be deployed to.
JavaScript VM - This will run an isolated Ethereum node using the browser. This is useful for quickly testing a smart contract, but the resulting blockchain is not persistent and will disappear once the browser is closed.
Injected Web3 - This will use whatever Web3 Provider the browser is currently connected to. For the purpose of this tutorial, this is the option we want as we have already connected our instance of Mist to our running geth dev node.
Web3 Provider - This allows you manually point the IDE to a Web3 Provider. For example, if we were running a geth node on another machine, we could connect our local Remix IDE instance to use the remote Ethereum node.
Below the Environment dropdown, there is an account dropdown. Here, we can select which Ether wallet we will use to fund the deployment of the smart contract. By default, we should see that the account dropdown is empty. This is because we have not yet authorized any Ether wallets to connect with Remix IDE. In the top right hand corner of Mist, click the pixelated top hat icon. We will see the following popup window.
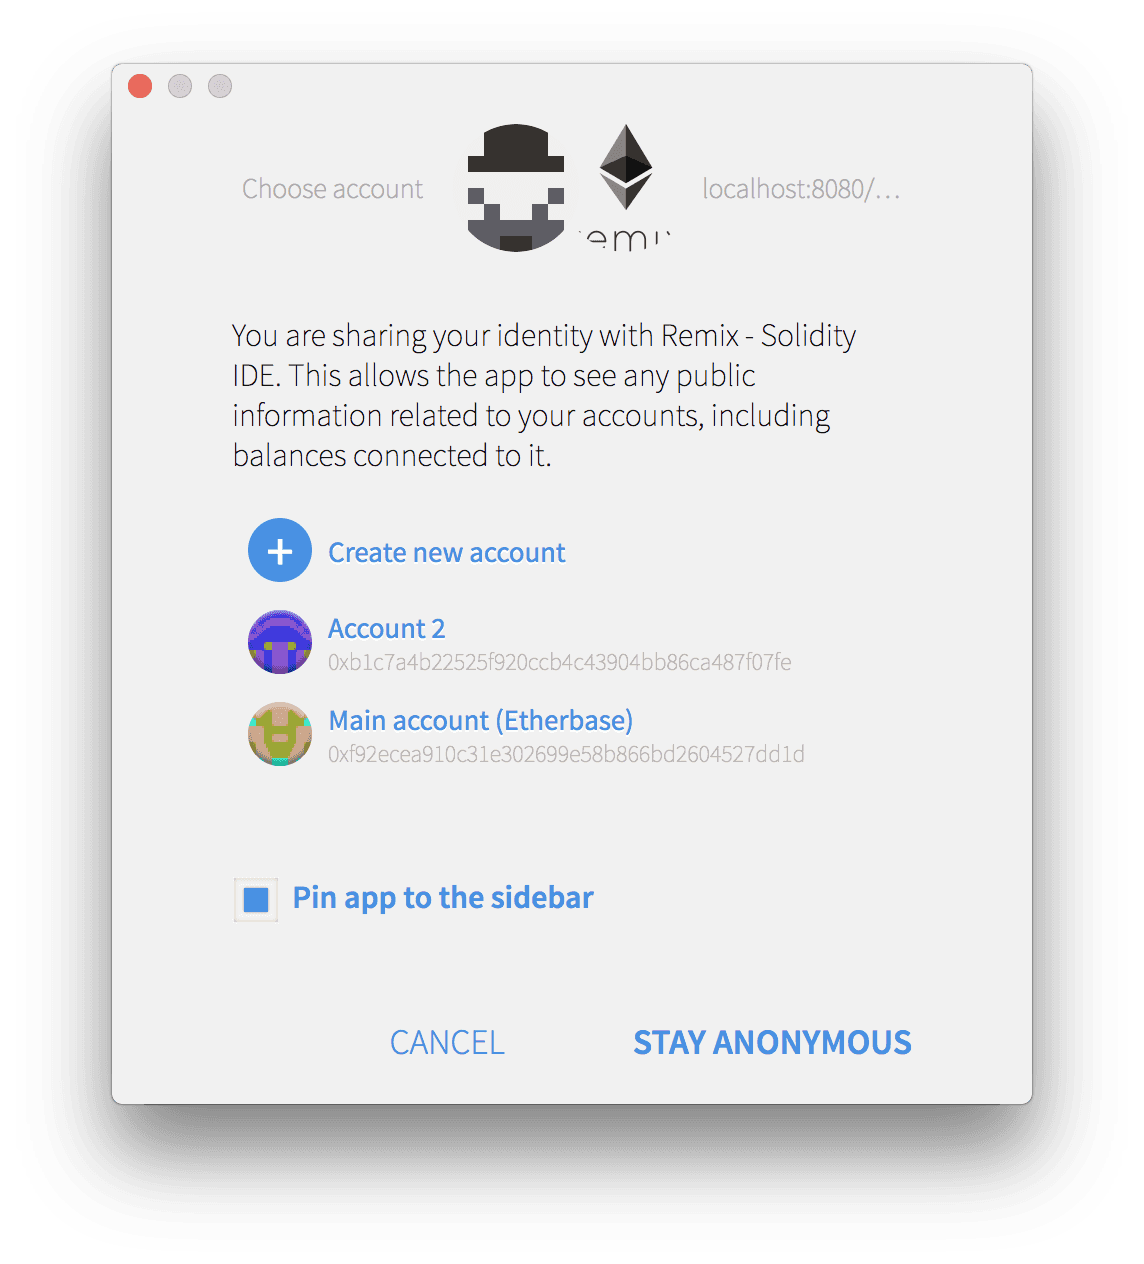
Select an account to authorize. We will use our Etherbase account since this is where our funds are currently. After we click authorize, the browser will refresh. Return to the Run tab, and we should see that an account is available in the dropdown.
Now it's time to deploy our smart contract to our private-net. In the run tab, in the second section of the panel, make sure that Donation is selected in the dropdown and click the salmon-coloured Deploy button below it. The following window will pop up.
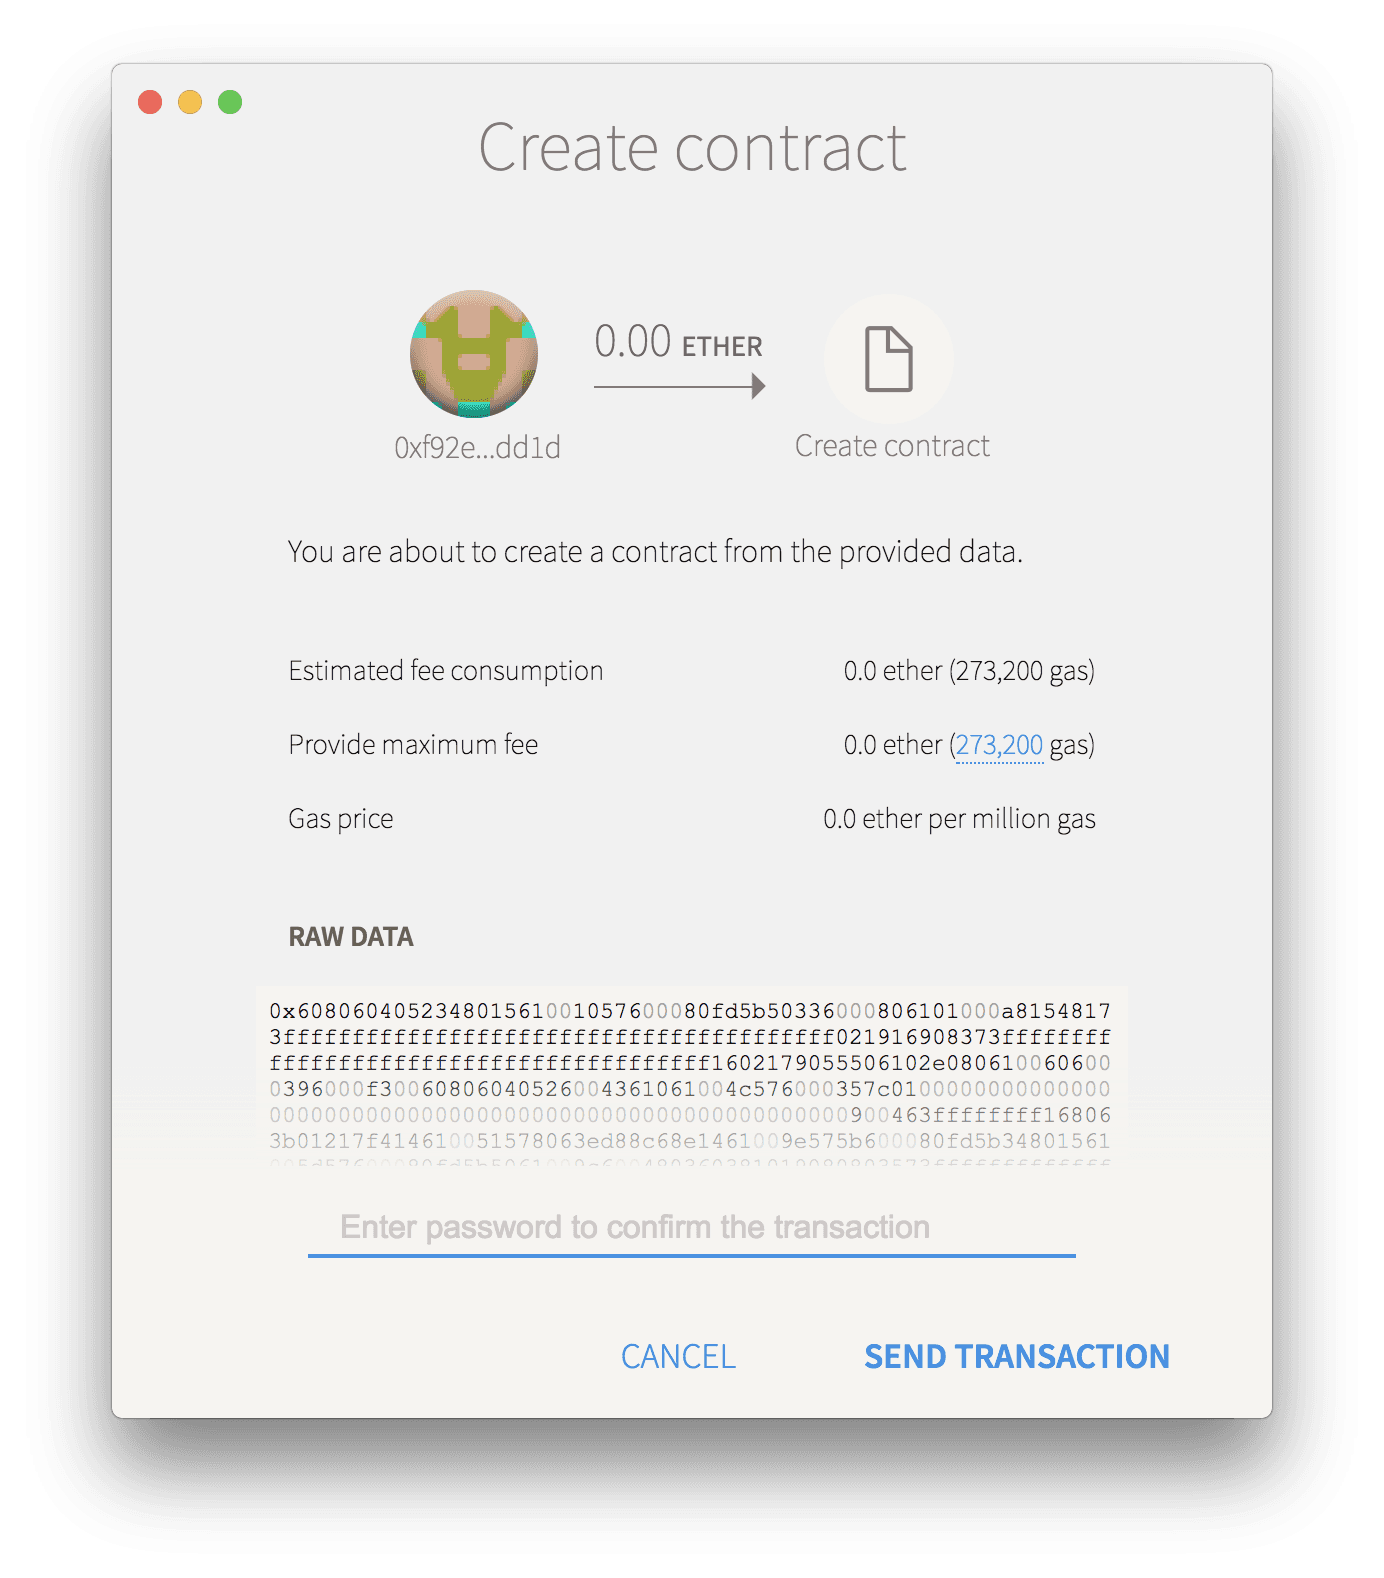
Enter your Ether wallet's password. If you are using a personal account, this would be the same password you entered when creating the account at the beginning of the tutorial. The default password for the Etherbase wallet is blank. Click the Send Transaction button.
Switch back to the geth terminal window. We will see the following output.
INFO [05-18|11:07:11] Submitted contract creation              fullhash=0xc6e89db6d500cb8cfa8f16ff590f4f866de0cc7fe31d60d84e6f72f43db39327 contract=0xE6D27720E581b5133EeB9011006A47C750AEa426
INFO [05-18|11:07:11] Commit new mining work                   number=1 txs=1 uncles=0 elapsed=2.536ms
INFO [05-18|11:07:11] Successfully sealed new block            number=1 hash=c551ee…91cd18
INFO [05-18|11:07:11] 🔨 mined potential block                  number=1 hash=c551ee…91cd18
INFO [05-18|11:07:11] Commit new mining work                   number=2 txs=0 uncles=0 elapsed=1.153ms
WARN [05-18|11:07:11] Block sealing failed                     err="waiting for transactions"
Great success! Our smart contract has been deployed to the blockchain. Take note of the contract address in the first line of output. This address may also be copied from the bottom of the Run tab in the Remix IDE window. This is the address at which our smart contract resides on the blockchain.
Using the Donation DApp
Now, our frontend is running and able to connect to geth via web3, and our smart contract has been deployed to our private-net blockchain. Let's put it all together.
With our Python SimpleHTTPServer running, load http://localhost:8000 in the Mist browser. In the top contract address field, paste the contract address that you copied from either the geth terminal window or Remix in the previous step. In the next line of fields, paste your Ether wallet address in the "from" field, and 1000000000000000000 in the "amount" field. This amount is 1 Ether in Wei. Now, press the give button and a transaction window will pop up.
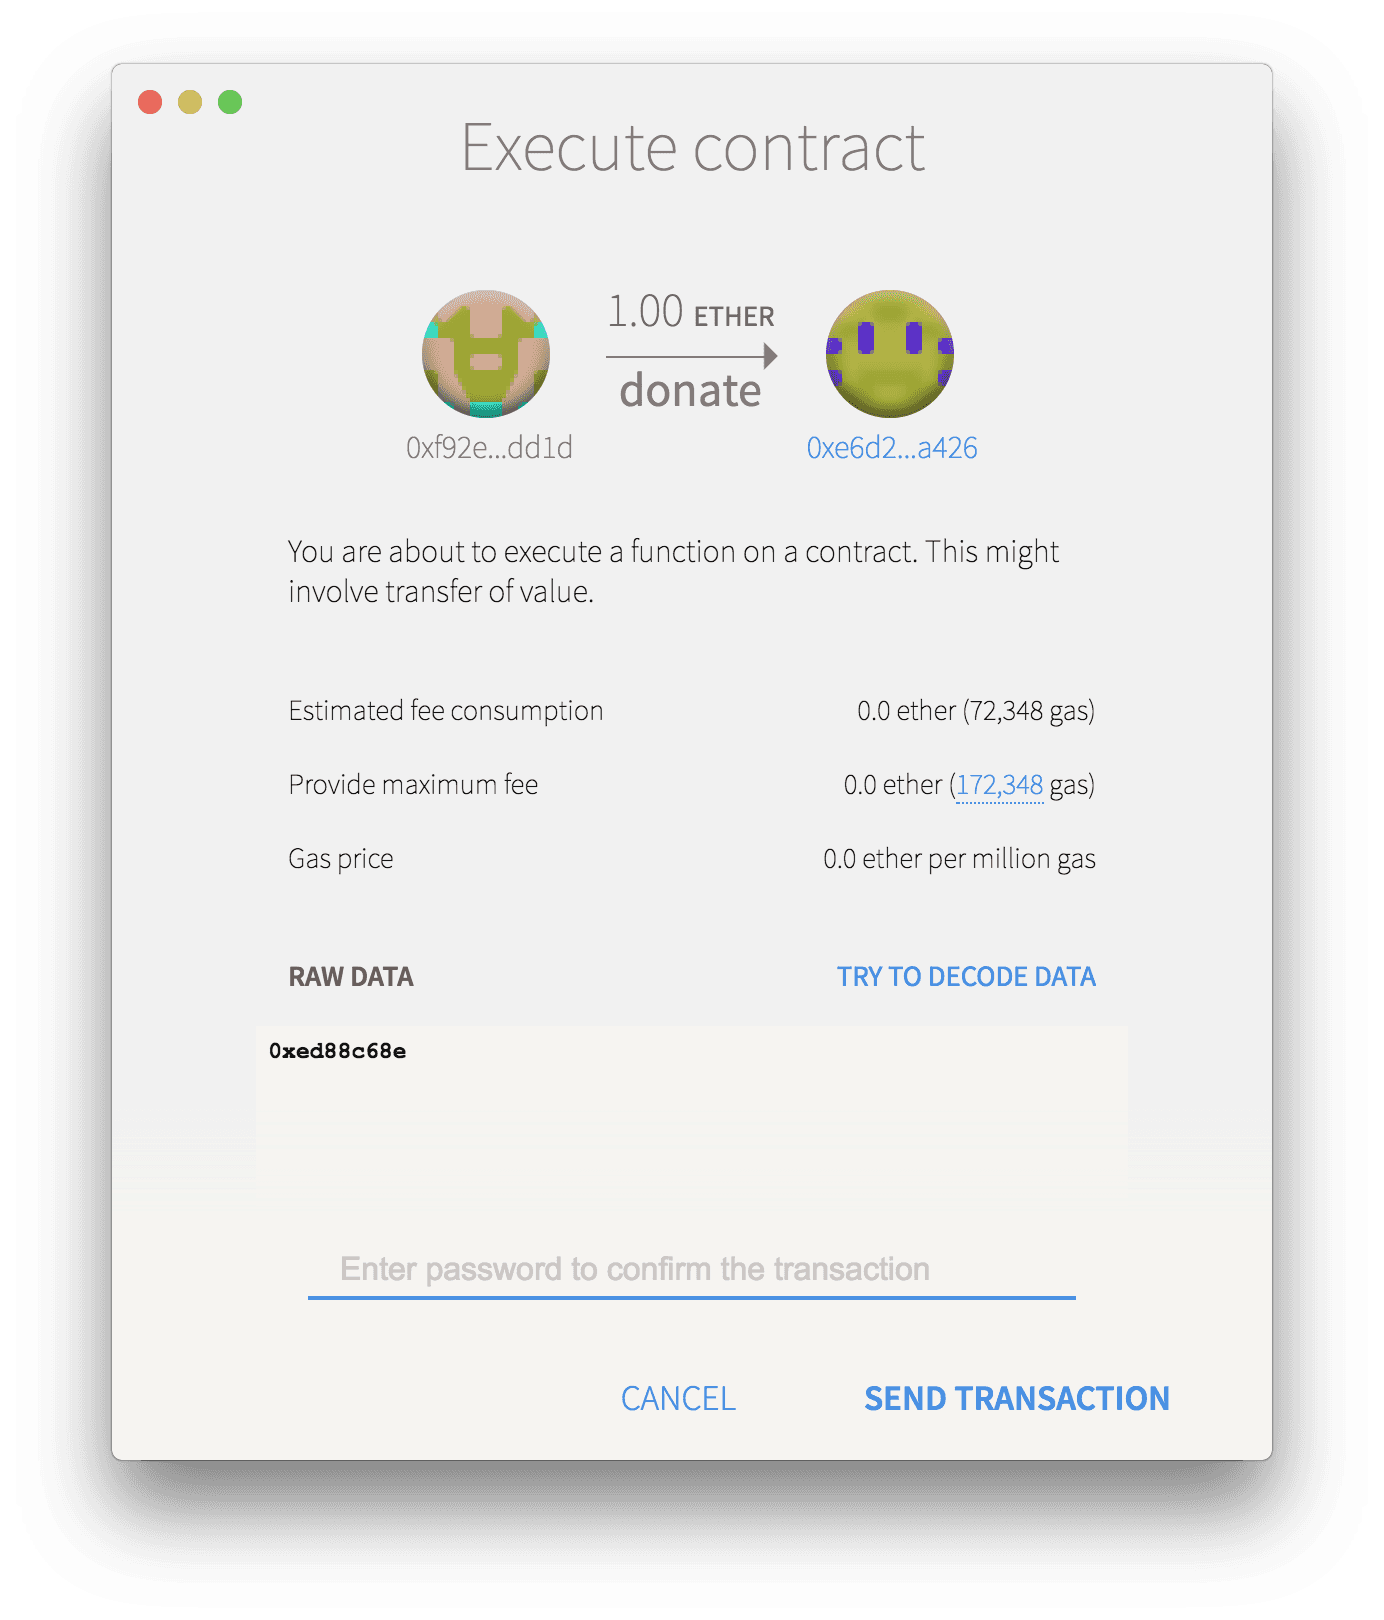
Enter your Ether wallet password and send the transaction. After a few moments, the DApp window should look like this.

Let's take a look at the geth terminal window to see what happened.
INFO [05-18|11:24:26] Submitted transaction                    fullhash=0x69c5346dbaf3b5a5415134c181ba16bcda76966bd60b9a42cf646651fc4a517a recipient=0xE6D27720E581b5133EeB9011006A47C750AEa426
INFO [05-18|11:24:26] Commit new mining work                   number=2 txs=1 uncles=0 elapsed=801.974µs
INFO [05-18|11:24:26] Successfully sealed new block            number=2 hash=f88586…e73ee1
INFO [05-18|11:24:26] 🔨 mined potential block                  number=2 hash=f88586…e73ee1
INFO [05-18|11:24:26] Commit new mining work                   number=3 txs=0 uncles=0 elapsed=514.943µs
WARN [05-18|11:24:26] Block sealing failed                     err="waiting for transactions"
The transaction has succeeded, and the Ether has been sent to the smart contract's address. Copy the transaction's fullhash for the transaction, and let's take a look at what happened under the hood.
Debugging the Transaction
We can step through the code executed by the transaction by switching to the debugger tab in the right hand panel of the Remix IDE window and pasting the fullhash into the "Transaction index or hash" field. Press the play button, to load the transaction from the hash. We can now use the slider or the forward and backward buttons to navigate through the execution of the smart contract's function.
Conclusion
We hope that this tutorial has helped you better understand the basic architecture of a DApp. Geth dev mode is a great way to get up and running quickly with a test Ethereum blockchain, and the combination of geth with Mist and a simple web server is a complete toolchain for basic DApp development.
